Jump to content
Store Testing In Progress ×

Blogs

Engine Swap Xflow to ST170 and 4 speed to 5 speed box

Hi I've had a lot of interest on my engine swap Xflow to ST170 Duratec or {Black top Zetec} with a Duratec badge on it And 4 speed to type 9 5 speed box at the same time. So thought Id have a go at a blog to assist owners with the process and put any info in one place A quick over view is ST170 Duratec is for the ordering of parts a Black top Zetec {carbs on the off side} Engine fits on to a type 9 gearbox with a flywheel from 1800 Zetec modded to take a cable clutch {retro ford} Alte

pickmaster Andy Lowe

pickmaster Andy Lowe

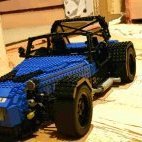
Lego westy rolling chassis

Decided on the wheels they are from a large lego technic car set ref 8880. They do not have quite the correct offset for the rear of the car if you look at the bottom right wheel in the pic (compared to the bottom left) this is one of the rear wheels I have skimmed the face back about 7mm. In Lego circles this is a no no you should never mod a brick : Does anybody know the largest tyre manufacturer in the world? Yes its Lego Here is the rolling chassis! but just when I thought the gearbo

2 steps forward one back

Firstly thanks for all the welcome messges - hopefully will get along to a local meet soon enough. Sunday is working out to be my Westfield day and some progress made today. Got the brake lines in front and rear which proved taxing for my feeble brain manipulating the pipe bender in 3 dimensions, but did it without sacrificing any of the tubes. Next need to turn the chassis for the front to rear brake line and fuel lines. After reading Dommos blog I noticed that the panel for the drivers foot

JPLS

JPLS

Lego Westy engine, diff and gearbox

Progressed further with the Lego Westy. I have built a few Lego technic cars in years gone by, I started with the 8860 car chassis model. The westy is a mix of old and new style lego technic pieces. Here is a pic of the rear chassis complete with rear suspension and diff. The diff configuration is a fairly standard set up on large lego technic car models: After contemplating which engine to use for about 1 second I decided on a V8 This engine either V8 or V10 is fairly popular in a lot o

Swapping Xflow to Zetec in Narrow Lowline Westfield

Hi all, This is my first blog so be gentle. Also usual disclaimer: I am an amateur builder, not a mechanic. I am working in a single garage with the usual small array of tools. I am writing this to hopefully help people thinking of doing the same in the future on a budget. Please take what I have written as this and not a "do it this way". I am certain that I will make mistakes and probably not do things the "proper way" it is "a/my way". Please feel free to comment and/or recommendations howe

Meakin

Meakin

Lego pieces sorted and ready to start..

Feeling guilty I didn't build my Westy I thought I would build a Lego Westy for no other reason than to stick a mini 'built not bought' sticker on it You cannot buy a Lego Westy from the shops so it has taken me a while to collate all the pieces required, I have a few spares at home and the rest were sourced from the good old interweb. This will be mainly a picture blog apologies for picture quality they will hopefully get better initial pics are with phone (no flash). Parts (some) collated

Arduino Switch Controller - finished

Well the steering wheel transmitter and dashboard are almost finished - now I need the wireless switch controller so it all works... Previous blog on button upgrade gave the basic details - this is a continuation. The heart of the switch controller is an Arduino Nano micro-controller - this is going to be the interface between the dashboard switches, wireless steering wheel buttons and the car's lighting, indicators, windscreen wipers and DigiDash2 GPS stopwatch. So far, I have go

Kit Car Electronics

Kit Car Electronics

Hello

Just a quick hello and introduction and as I got this membership as an Xmas gift, thought I might as well post a blog! Live up here in Leyland, Lancashire so hopefully will be getting along to some local meetings. I recently (finally, some may say) bit the bullet and purchased the Mazda SDV version of the Westfield. Been through a couple of previous mid life crisis moments with motor bikes, but now somehow suddenly started to feel mortal, so they have gone and am reverting to 4 wheels. Bought

JPLS

JPLS

Carbon dash drilled and lacquered

I know how we all love a good dashboard post, so here's my contribution Spent an unbelievable number of hours in the planning and cutting, considering how few bits there are to it! No comments about sneezing with a mouthful of switches please... Now I need to be patient and let the lacquer harden before I can polish it and fit the switches Well I wasn't very patient, so here it is with the switches and dials in place, plus the wireless steering wheel button project...

Kit Car Electronics

Kit Car Electronics

Steering wheel finished

Well I've managed to tear myself away from the Christmas food and drink long enough for a quick update... Quick release arrived from Playskool - I'm really impressed with how solid it is, now fitted. Wheel is totally finished and working perfectly (in my study, anyway ) Took a lot of fiddly soldering and heatshrink, but pleased with the results - here's the messy side: The transmitter fits snugly inside the black box, velcro'd to the wheel - so easy to change the battery when the indica

Kit Car Electronics

Kit Car Electronics

Steering wheel button upgrade - 14th Jan 13

Thought I'd share the details of my latest unnecessary upgrade... I decided to change to a carbon dash and ETB Digidash2. This meant new switches, so Savage aluminium ones went on the shopping list. Then I thought a detachable wheel boss might be nice, but also wanted indicators and main beam switches on the wheel - but how to connect them? Curly lead? No thanks, why take the easy option when I could make it complicated... This project will probably take me all winter, so hopefully it will wo

Kit Car Electronics

Kit Car Electronics

Electric Mirrors Upgrade - Part 3

A bit of fresh air was needed today, so I used some fine cutting compound, followed by Autoglym SRP and finally some wax. Three coats of each left me with this Then I cleaned the mirror glass and applied some Rainex. I also cleaned the plastic glass surround with some trim detailer And finally I re-assembled the mirror The windscreen pillars need a small amount of modifying. I drilled out the fixing holes to enlarge the diameter of them. This allows the mirror to be rotated slightly t

KugaWestie

KugaWestie

Electric Mirrors Upgrade - Part 2

I picked the job up again this afternoon, and decided to fit the switch into the dashboard. Firstly I chose my position Then I cut away the vinyl and foam very carefully, followed by drilling a series of holes to form the square hole After some tidying up with a file, the switch is in Whilst out collecting some last minute bits today, I picked up a can of top coat paint. I sanded one of the primed mirrors down with 800 grit wet and dry, and gave it a couple of coats. More to

KugaWestie

KugaWestie

Electric Mirrors Upgrade - Part 1

Several months ago I bought a pair of electric mirrors and a control switch on E-Bay They are from a MGF (Rover) So yesterday I decided to have a go at getting them sorted out and fitted. The first job was to whip the battery off the Westy. I bought the battery inside and sat at the dining room table and got stuck into working out the wiring on the mirrors and switch. This didnt take too long with the help of google. Once I got both mirrors 100% operational, I labelled up all the wires and

KugaWestie

KugaWestie

Initial set up

Hi Guys, I am busy carry out winter upgrades at present. My intention is to share those upgrades with you all on this blog. More to come when I have completed some of the work

KugaWestie

KugaWestie

First entry

For the build thread, look here: http://forum.wscc.co.uk/forum/index.php/topic/89450-donor-done-build-started/ It's not had a lot of use in damp conditions this year, but now it's cold out I'm beginning to notice how twitchy it is. I'm not getting a lot of grip from reasonably new tyres so I'm suspecting it's the lack of alignment beginning to show. I'm trying to hold off getting it aligned until the spring, but as my big plans for winter upgrades slowly dissolve into a deposit for a house up

Dommo

Dommo

A life of Verona

Star Date 16/12/12 So this is my blog, more stuff and nonsense, more opinions to annoy people. Now what shall we blog about? Well if my car was getting it's usual blats we could talk about the car, but it isn't so we won't. We could talk about the progress of the new porch but as that's on hold until after Christmas we can't. We, well I, could talk about how very ill I've been (man flu, so nothing serious) but that's boring. OK, I can't think of anything to talk about. So you read it here

Norman Verona

Norman Verona

hi

hi im steved i have read the rules and apparantly i cant say or do to much so.............................. goodbye

SteveD

SteveD

First time for everything........

Evening all, Time is short today so may I Introduce myself. I'm James Alexander (Alexander72) and less than a year ago I bought my first Westfield from Martin Parkes. Its a 1990 SE with a X-Flow engine and lots of bits and pieces. It starts, and goes, and stops - thats the limit of my knowledge. Oh, kids point at me in it and depending on their age they either say "look at that racing car" or "that man is too big for that car... what a.........." I'm planning on doing some competition ne

alexander72

alexander72

  • Blog Statistics

    55
    Total Blogs
    435
    Total Entries
×
×
  • Create New...

Important Information

Please review our Terms of Use, Guidelines and Privacy Policy. We have placed cookies on your device to help make this website better. You can adjust your cookie settings, otherwise we'll assume you're okay to continue.