djm Posted October 19, 2018 Posted October 19, 2018 10 minutes ago, Mark (smokey mow) said: All that said, the Carburol Special does have a few extra tubes in the nose and pedal box area, which I'll also be sheeting in aluminium so that will offer so additional and much needed protection. You can see the additional nose tubes in the picture below. Could you use carbon fibre for extra protection? Or are you trying to keep the restoration as original as possible? Quote
Mark (smokey mow) Posted October 19, 2018 Author Posted October 19, 2018 1 hour ago, djm said: Could you use carbon fibre for extra protection? Or are you trying to keep the restoration as original as possible? Originality is important to me for both rebuilds so I've steered clear of anything that wasn't available in the 1960's. It's always an option for whoever owns the car after me to do something different but in theory a reasonable gauge of aluminium should work equally as well as carbon but at the expense of a bit of extra weight. 1 Quote
robhume Posted October 20, 2018 Posted October 20, 2018 Glad to hear you will be adding a bit of ally sheet around the feet area. Regarding the fuel tank, I remember on my original JW, I used an Atco lawnmower tank which I think held about a pint and was gravity fed, with a little stop dangler at the bottom. I also remember the car being one that you wore, rather than just sitting in it. I'm really looking forwards to seeing it finished and running, which I am sure will be a new experience for you. 1 Quote
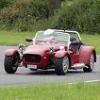
Mark (smokey mow) Posted October 21, 2018 Author Posted October 21, 2018 At last some proper progress pictures. With the chassis unloaded from the trailer the first job was to clean all the powder-coating from inside all the holes with a reamer. I'd had the forethought to leave nuts on all the threaded studs so as to protect the threads and make it easier to clean those. I could then begin the task of assembling everything and the first job was fitting the new rear axle assembly. The pedals went in next. Followed by master cylinders and tachometer. The tacho is the original Krober unit from the Carburol Special so I was keen to re-use it. Whilst it's not within period for a JW4 I wanted to retain it as it's a part of the cars later history, the rubber mounts had all perished but luckily i was able to source some reproduction parts for it from Germany. Making good progress the rear wishbones and uprights were next to go on before the light outside began to fade too much and I was forced to call it a day. 5 Quote
Mark (smokey mow) Posted October 21, 2018 Author Posted October 21, 2018 After a brief spell of gardening this morning I could then get back to working on the car and todays first task was to fit the steering rack. I hadn't fitted it yesterday as I'd discovered the mounts were threaded UNC rather than UNF like the rest of the bolts. I thought I'd have to order some but then by chance stumbled across a pack of bolts the right size as I was clearing up yesterday. Then the front uprights and wishbones. I'm yet to order the shocks so the steel box section is just a temporary measure to keep everything in place for now. I'd made them when working on the first car and luckily had kept hold of them. Steering wheel and steering column going in. And finally the rear trailing arms. That's about as much as I can do for now as I've run out of UNF bolts in the right size. 4 Quote
Nic Chase (NICO) - Shropshire & Mid-Wales AO Posted October 21, 2018 Posted October 21, 2018 Good work Mark. That must feel very satisfying. Looking very smart. Quote
corsechris Posted October 21, 2018 Posted October 21, 2018 That’s a little piece of automotive jewellery. Beautiful. Quote
Mark (smokey mow) Posted October 21, 2018 Author Posted October 21, 2018 2 hours ago, Nic (NICO) - Shropshire and Mid-Wales AO said: Good work Mark. That must feel very satisfying. Looking very smart. 26 minutes ago, corsechris said: That’s a little piece of automotive jewellery. Beautiful. Thank you, its good to finally be bolting parts together and I have to say that it so much easier to assemble a single seater than it is a Westfield The only problem with the current speed of building is that I'm rapidly running out of parts and I need to start spending some serious money to get the rest of them made. Quote
KugaWestie Posted October 21, 2018 Posted October 21, 2018 Looking very good Mark, keep up the good work 1 Quote
Alan Cutler (Adge) - Dorset AO Posted October 23, 2018 Posted October 23, 2018 Beautiful piece of automotive engineering. 1 Quote
Mark (smokey mow) Posted October 27, 2018 Author Posted October 27, 2018 One step forward and two back this week. I'd been looking at wheel options for the Carburol and had originally planned to fit Minilite wheels. Being a 10" 4x4" PCD mini fitment there's plenty of choice and I particularly liked the look of the 67 motorsport show car with them on. As I'd got a spare pair kicking around the garage I dropped them onto the car for a quick look and to my surprise they didn't fit The fronts went on fine but the offset was all wrong at the rear even with the standard 1" spacers. The inside edge of the rim locked itself to the upright and there was no hope of them ever fitting. After some intense googling and careful measuring a 5x10 minilite is an ET17 offset, but as it transpires I need an ET0 so not a hope of getting them to go on. The options open to me were to move up to a 12 or 13" wheel as these diameters were used on the post 1968 JW4's and available in the correct offsets for the Hillman Imp and ?mg Midget or failing that find something other than a 10" Minilite. More googling and the only wheels I could find that were close to ET0 in a 10x5 were the revolution 4-spoke, this is one of my favourite wheels as when during my younger years I ran a set on my RC cars, but on a JW4 they weren't ever an original option and so not one to consider if I want to do an accurate rebuild. For the same reason I also had to discount the larger wheel sizes as whilst they were used on the post 68 cars this chassis is a 1966 build and so would only ever have used a 10" wheel. So that then begs the question of what I could use? There was a long pause for thought and Then I remembered that I had just the thing lurking in the garage, I's been saving them for something else, but needs must and what better wheel to fit? If you've been following this thread since the beginning you've probably guessed by now but for the benefit of everyone else it's the JA Pearce Magna. Thankfully unlike the last set I bought for the first car didn't have to sell a kidney to buy these but they're a little rough around the edges after 50 years and need repainting but they should clean up ok and most importantly they fit and are the correct period wheel for the car. 2 Quote
Mark (smokey mow) Posted October 27, 2018 Author Posted October 27, 2018 Before I get too far with assembly I thought I'd better get the brake lines fitted. I'd actually planned to do it last weekend until I found I hadn't quite got enough brake pipe so I decided to leave it until I had bought some more. As with the first car I wanted to avoid using any modern fixing methods and definitely no cable ties so for the hard lines I'm using brake saddles from the Series 1 Land Rover and BSA Norton rubber cable ties. 3 Quote
Mark (smokey mow) Posted October 28, 2018 Author Posted October 28, 2018 A few more small jobs completed today. The pedal assembly is an unnecessarily complex affair with a pull rod acting on a simple balance bar to the master cylinders. Not unsurprisingly the JW4 was criticised for the vagueness of feel and the amount of play through the linkages. Even the throttle pedal is over complicated with the addition of a couple of linkages to allow for a twin throttle cable setup. 2 Quote
Mark (smokey mow) Posted October 28, 2018 Author Posted October 28, 2018 After what seemed like ages messing around with clevis' and split pins I could then get on with something different. When the Carburol Special was modified for hillclimbs a crash box was formed around the pedal assembly in the nose. During a trial fit of the pedals a couple of months ago I'd spotted that in the pedals wouldn't fit in the two forward most positions as they'd hit one of the additional new chassis tubes in the nose. The Carburol Special ran a much more upright seeting position compared to when it was a JW4 so I presume this wasn't a problem, but as I'm quite long legged I wan't to be able to use the full range of pedal positions. There was no way round it and the tube had to be cut out, but I wanted to retain the option for it as it helped to stiffen the nose and more improtantly offers addition feet protection so I'd deceided to make the chassis tube removable. As the orignal tube had been butchered by the angle grinder a new one had to be made. The ends were then drilled and threaded so it could easily be unbolted when required. 2 Quote
Mark (smokey mow) Posted October 28, 2018 Author Posted October 28, 2018 Final job for today was to make some spacers on the lathe for the roll bar backstay. 4 Quote


Recommended Posts
Join the conversation
You can post now and register later. If you have an account, sign in now to post with your account.