Jump to content

Leaderboard

  1. Alan Cutler (Adge) - Dorset AO

    Alan Cutler (Adge) - Dorset AO

    WSCC Member with Mag


    • Points

      9

    • Posts

      3,739


  2. Mark (smokey mow)

    Mark (smokey mow)

    WSCC Member with Mag


    • Points

      4

    • Posts

      11,015


  3. Ian Kinder (Bagpuss) - Joint Peak District AO

    Ian Kinder (Bagpuss) - Joint Peak District AO

    Moderator


    • Points

      3

    • Posts

      11,270


  4. corsechris

    corsechris

    WSCC Member with Mag


    • Points

      3

    • Posts

      6,741


Popular Content

Showing content with the highest reputation on 30/12/17 in all areas

  1. Its once again been far too long since I gave a progress update on this build thread. My summer was largely spent block paving the driveway at my girlfriends house and now I'm mid-way to refitting her kitchen but theres still been a little progress on the JW4. First up was the fuel tank. The JW4 ran two fuel tanks, the main tank was in the nose ahead of the drivers feet and the second smaller lift tank was fitted in the engine bay. The fuel pump was mechanically driven by a cam off the rear axle and would pump the fuel from the nose tank to the engine bay tank only when the car was in motion. The fuel would then be gravity fed from the smaller tank to the carb. As my intention is to only use the car for sprints the smaller tank should be enough for that purpose and i will be fitting a crash box in the place of the main tank. Way back in April before Stoneleigh I'd sketched out some ideas for the tank to try and mirror the design for engine bay tank originally fitted and made plans to see the fabricator once I returned home from the show. Plans however changed over the Stoneleigh weekend when by chance I found a small air reservoir tank on one of the auto-jumble stands that would almost be perfect. It had a few holes that needed plugging and was obviously missing a fuel filler but it had enough potential to be useable for the build. After I got home it was dropped off with Martin at .mjs Fabrication and he set about transforming it into a fuel tank for me. The before and after results. The other major progress albeit not with the car is that I've now had all the drawings scanned for the JW4 and Johnny Walker's other projects. In the end it amounted to some 250 drawings covering the various cars, prototypes and Karts that emerged from his factory between 1965 and 1968. Having everything in an electronic format will make things easier for me when sending drawings to have parts made and also searching for drawings as they're currently stored in about 20 tubes.
    4 points
  2. Oh sorry I meant track day
    1 point
  3. I'm imagine the powerflex items are polyurethane and hence more firm than the standard metalastic ones. The advantage is it hold the suspension more accurately in place as they give less. The disadvantage is they may be slightly harsher with bumps etc on the road.
    1 point
  4. MHR Adge, see you on Thursday night. Jon
    1 point
  5. Thanks, not convinced by your maths though
    1 point
  6. You could try asking these people http://www.collectorscarparts-heathrow.co.uk/ They have a large stock of old parts and are good at identifying them. Geoff
    1 point
  7. I'm in Derby..I have one you can borrow.....or drive over and we can check it 'while you wait'
    1 point
  8. I sell the ledlenser ones and we have 20 % off in January very well made and much better light than the cheap efforts off ebay a lot of those have claimed more lumens but the lens is a significant part which are superb on the ledlenser stuff they angle up and down and yes they focus too - battery or rechargeable options
    1 point
  9. Highlight: Cam upgrade Lowlight: On the way back from cadwell, in the freezing cold and rain, the toll booth man wouldn't let me off the 40p so I had to spend ten mins holding up traffic while I went through all my track day paraphinalia to find my wallet. If you've been on track day with me, you'll realise this is an unfeasible amount of stuff to fit in a westie.
    1 point
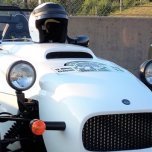
  10. Thought I'd have a look at some of the new stuff I'd got off Santa today. Tonneau cover form Soft Bots for Sevens, I've got lots of their other bits, so decided to keep to the same company, took a couple of months to convince them to take my money ( odd business model ) but they did in the end. Took my home made cover off and offered it up. As i'd sent them measurements on 2 different occasions, I was hoping for a more tailored fit. The inboard harness eyelet area look decidedly dodgy to me. So I held off fitting it, and have dropped them a note. Moved onto the grill, now in yet another controversial move, I like the 7 front grill, and the Mrs bought me one of the laser cut stainless ones for xmas. I was expecting a real struggle to get it to look anywhere near fitted as my early westy front nosecone doesn't look bug enough. But with a bit of messing about, I got it to a point I'm happy with. So back indoors and started on the new Lego ( well it's Chinese copy Lego, so Chego is probably more correct ) Got this far, and decided I'd stop for now and start on a new bottle of JD instead. I'll need to go back to work for a rest at this rate ! Finished the Chego
    1 point
  11. You will need to apply some pressure from underneath to get the rod end to sit tightly in the taper of the steering arm. A length of wood on a trolley jack would work and only enough pressure to stop it spinning. John
    0 points
×
×
  • Create New...

Important Information

Please review our Terms of Use, Guidelines and Privacy Policy. We have placed cookies on your device to help make this website better. You can adjust your cookie settings, otherwise we'll assume you're okay to continue.