Mark (smokey mow) Posted July 12, 2023 Author Share Posted July 12, 2023 Back on it again this week. Looking at the bonnet I felt it didn’t quite look complete and needed a small windscreen. I cut and folded a strip of aluminium to make a mounting and then ran it through the rollers to put a slight curve on it to match the profile of the bonnet. I then used a scrap piece of aluminium to mock up a small screen and get a shape I liked. once happy I then cut the screen from 2mm polycarbonate and riveted it to the aluminium mount. 5 Quote Link to comment Share on other sites More sharing options...
Mark (smokey mow) Posted July 12, 2023 Author Share Posted July 12, 2023 The last major task is the nose cone. I must confess I’ve been putting this off and it’s been redesigned more times than any other part of the racer. My first thoughts were to fabricate from steel or aluminium since they’re materials I’m happiest with but eventually I settled on fibreglass since it would allow me to introduce sone curves. First job was to make a buck. As I’d already drawn the nose in 3D in Solidworks I made some prints of the profile at 50mm intervals to give the general form. these I then to roughly cut the shapes from 50mm thick insulation. Rye four layers of this were then glued together to roughly form the nose. Once the glue dried these were then cut to the final shape and then sanded to the finished profile. Onto the buck I then applied 2-3 layers fibreglass resin and chopped mat. I’ve not done much with fibreglass so the end result was looking somewhat lumpy but generally what I hoped for. Much like my skills at plastering walls it needed plenty of sanding to remove the high spots and then I gave it another light brush over with resin to fill any holes. the insulation was then cut out from the inside leaving the finished nose cone. 4 Quote Link to comment Share on other sites More sharing options...
Mark (smokey mow) Posted July 12, 2023 Author Share Posted July 12, 2023 With the nose complete it was fettled to the final shape and offered up to the chassis. An aluminium bracket was made to fix it to the top of the chassis and a Dzus fastener fitted. The bottom is secured in a similar way with a Dzus fastener through the floor. the back of the bonnet will be fixed with slide fasteners. 7 1 Quote Link to comment Share on other sites More sharing options...
Mark Stanton Posted July 13, 2023 Share Posted July 13, 2023 Absolutely brilliant 👍 I hope you get a huge bucket load of WSCC stickers for your downhill rocket and plenty of well deserved sponsorship for your first event 👍 Quote Link to comment Share on other sites More sharing options...
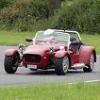
Popular Post Mark (smokey mow) Posted July 22, 2023 Author Popular Post Share Posted July 22, 2023 Not much progress to show for the last couple of weeks as I’ve been very busy with work but I did manage to get the screen finished and some colour on the bodywork. my pushing team suggested I needed something a bit bolder than plain red so I’ve gone for a bright camo vinyl wrap. there’s a few bits to finish on the nose cone before it’s fitted but I’m almost there and ready for testing. 11 Quote Link to comment Share on other sites More sharing options...
Stuart Davis (fatblokestu) AO - Devon & Somerset Posted July 23, 2023 Share Posted July 23, 2023 10 hours ago, Mark (smokey mow) said: Not much progress to show for the last couple of weeks as I’ve been very busy with work but I did manage to get the screen finished and some colour on the bodywork. my pushing team suggested I needed something a bit bolder than plain red so I’ve gone for a bright camo vinyl wrap. there’s a few bits to finish on the nose cone before it’s fitted but I’m almost there and ready for testing. Looks brilliant Mark. On the subject of pushing, do you have a very short team (🤪🤣) or will they have something higher up to push on? Quote Link to comment Share on other sites More sharing options...
Mark (smokey mow) Posted July 23, 2023 Author Share Posted July 23, 2023 1 hour ago, fatblokestu said: Looks brilliant Mark. On the subject of pushing, do you have a very short team (🤪🤣) or will they have something higher up to push on? They’re short 😀 it’s a ramp start so the push is only to get me onto the slope rather than running on a hill. 1 Quote Link to comment Share on other sites More sharing options...
Stuart Davis (fatblokestu) AO - Devon & Somerset Posted July 23, 2023 Share Posted July 23, 2023 1 hour ago, Mark (smokey mow) said: They’re short 😀 it’s a ramp start so the push is only to get me onto the slope rather than running on a hill. Funny 😄 How’s the weight looking? The kart not you 😉 Quote Link to comment Share on other sites More sharing options...
Mark (smokey mow) Posted July 23, 2023 Author Share Posted July 23, 2023 7 hours ago, fatblokestu said: Funny 😄 How’s the weight looking? The kart not you 😉 I’m yet to get it corner weighted😀 The Solidworks model suggested 60kg. That was excluding all the bolts and hardware so I’d guess at around 65kg now. Most of the weight is on the front axle so by the time I’m sat at the back it should be around 60/40. 1 Quote Link to comment Share on other sites More sharing options...
Popular Post Mark (smokey mow) Posted August 21, 2023 Author Popular Post Share Posted August 21, 2023 I’ve not had a chance to do much on the car over the last months due to holidays but last weekend I took it along to the local car show and it attracted plenty of attention. Promotion of the race by the organisers is now also In full swing and it’s even made it onto their social media posts. 9 1 Quote Link to comment Share on other sites More sharing options...
stephenh Posted August 21, 2023 Share Posted August 21, 2023 Mark, do you have any plans to compete anywhere in the midlands? Quote Link to comment Share on other sites More sharing options...
Mark (smokey mow) Posted August 21, 2023 Author Share Posted August 21, 2023 19 minutes ago, stephenh said: Mark, do you have any plans to compete anywhere in the midlands? Not yet, but I’m looking at my options for next year depending on how the Colchester event goes. I hadn’t realised there was so many events around the country till I started looking into this. there’s a full list of events here https://www.soapboxuk.uk/calendar.php 1 Quote Link to comment Share on other sites More sharing options...
SootySport Posted August 30, 2023 Share Posted August 30, 2023 You could go international and compete in the Red Bull series, just like Max😀 1 Quote Link to comment Share on other sites More sharing options...
Mark (smokey mow) Posted September 2, 2023 Author Share Posted September 2, 2023 Only a couple of weeks to go until race day, so today I went to check out the competition at the Bury St Edmunds soapbox race. there was the usual variety of builds on display from the very simple I love the shoe on a handle for the brake To the much more adventurous. The team from Sealey tools had really gone to town building a full roll cab compete with pull out drawers and tool kit. The best costumes were dastardly and muttley This meccano build looked great too 1 1 Quote Link to comment Share on other sites More sharing options...
Chris Larner Posted September 2, 2023 Share Posted September 2, 2023 Looking forward to coming to cheer you on. Build looks epic. 1 Quote Link to comment Share on other sites More sharing options...

Recommended Posts
Join the conversation
You can post now and register later. If you have an account, sign in now to post with your account.