JeffC Posted March 1, 2007 Posted March 1, 2007 There has been a couple of threads on recently about repairing damage etc to gel coats and fibreglass etc.. so Ive done a step by step how to paint a westy One of the local members bought this westy and doesnt like the bell-end colour (purple not my thing either ) He looked into retubbing it but not wanting the spend or the money either he legged me into a colour change.. first job is to strip off as much as possible, scuttle , nose , lights etc. would be a better job to remove the rear arches but this car they have been bonded on so have been left on.. this tub had a few holes that have been drilled for spare wheel carrier etc.. these need to be filled in.. if there is any cracks drill a small hole at the end of the crack to stop it spreading , grind the crack to a V and rough the surrounding area and also rough up the rear of the area to be repaired with an 80 grit sand paper.. , mix up some fibre glass and spread through the hole and into the recess you have ground. spread the glass around the rear to give extra strength next block sand off with 80 grit sandpaper till it is slightly lower than the surrounding bodywork .. mix up some standard bodyfiller and spread over the sanded area.. when dry block sand with a 180 disc untill it is level with the surrounding bodywork, when it is da sand the surrounding area to allow the primer to key , I used a 320 da disc.. now give a couple of coats of primer, allow to dry then the repair work is complete.. to allow the paint to key to the gelcoat it needs to be sanded , use either a 400 grit on a da sander or 1,000 wet and dry. everything that is to be painted needs to be sanded in this way take care making sure the edges are well keyed. I hired a booth for the topcoat to be applied, you could paint it in a well ventilated garage as long as its warm. mask up anything that you dont want painting. the panels now need to be degreased to remove any wax or silicones.. New to me the next bit , go over the full car with an antistatic spraygun that blasts a jet of air and stops any dust particles been attracted. thats me watching the experts and proving you are never too old to learn new tricks Quote
JeffC Posted March 1, 2007 Author Posted March 1, 2007 the colour Im painting this one is a 4 stage pearl and first the car needs to be painted white, I used a non sand wet on wet primer but a normal white basecoat would have done job equally as well. If I had been painting this a normal colour there is no need to prime the gelcoat simply go straight over the top with your colour, I would recomend to use an adhesion promoter to help but prob more of a belt and braces job.. 10 minutes flash off and a groundcoat orange can be applied, this is a very transparent colour and takes 3 full coats, quite important to make sure this colour is solid or the pearlcoat wont get the correct effect. once solid the pearl coat is laid over the top, It is very transparent and quite difficult to see it going on 3 coats later and 10 minute flash off and its time to apply the laquer, I use sikkens 2k with an elastic additive to help with stonechips and flexing Quote
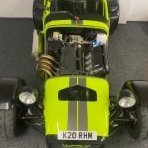
JeffC Posted March 1, 2007 Author Posted March 1, 2007 A quick low bake then left over night to dry and back home for the rebuild .. Once dry any bis of dirt can be wet flatted out with 2,000 wet and dry then buffed back up with G3.. Luckily for me this is fairly clean so I will get away with the job " off the gun " and a bit of free advertising Quote
slippy Posted March 1, 2007 Posted March 1, 2007 Nice work Swiss is this going to be in the next mag ? Quote
John Loudon - Sponsorship Liaison Posted March 1, 2007 Posted March 1, 2007 This would make a good mag feature Jeff. Get it sent in PS-whats your price? Quote
JeffC Posted March 1, 2007 Author Posted March 1, 2007 This would make a good mag feature Jeff. Get it sent in PS-whats your price? I was originally going to save it for the Mag but thought would be more use posted on the board, I mailed Peter few weeks ago but I think the pictures he needs are better than the ones I took and Im certainly not painting it purple so I can take them again Quote
Hammy Posted March 1, 2007 Posted March 1, 2007 Thx for that, looks a damn nice job. Was that a white primer you used ? Do you need a special primer for fibre glass ?? [ Between you and me ...I'm... erm... cough... thinking of spraying an old bonnet satin or matt black - for the reason of no colour match problem , I also want to use big aerosols (sorry but there you go) as I last used my spray gun to paint the fence and proper paint ofr a small job is not cheap. Flat/satin black should be easier to get a reasonable finish, if its a disaster I can sell the bonnet on] Quote
MVS Posted March 1, 2007 Posted March 1, 2007 Very nice work, nice colour, really nice wheels too. Nice contrasting purple engine bay?? Quote
JeffC Posted March 1, 2007 Author Posted March 1, 2007 Nice contrasting purple engine bay?? painted everything internal in satin black Quote
Norman Verona Posted March 1, 2007 Posted March 1, 2007 But Jeff to see rael painting look the last weeks entry in my rebuild diary. the rebuild diary Quote
Stevo Posted March 1, 2007 Posted March 1, 2007 Good work Jeff, and I am sure those photos would be fine for magasine printing. Apparently there are some members who don't use the internet - so it may well be worth submitting. Also, as others have asked how much would it cost? a) to DIY and b) to employ a professional (such as yourself) Quote
John Loudon - Sponsorship Liaison Posted March 1, 2007 Posted March 1, 2007 Are you sure thats the same car before and after Jeff? The front shocks have gone from yellow Spax to black AVOs during the spray Good work mind. When can I drop mine off? John Quote
Recommended Posts
Join the conversation
You can post now and register later. If you have an account, sign in now to post with your account.